Links


Banner

Showing posts with label Clay. Show all posts

December 16, 2019


I'm excited to share our next newsletter - December Newsletter, check it out! 


To view the PDF, just click on the link above and download the PDF to you computer. You do not need dropbox or to install anything, just download the file.


Like us on Facebook: 
Buckner Elementary Art


Like us on Instagram and Twitter: 
Art is my Jam

August 24, 2019


Amazing things to have
in any art classroom...besides the basic supplies.

I have found some great things over the years that no matter where I'm teaching, I need in my life, lol.  Besides the basic supplies (markers, clay, etc...), these things I use all the time and I find myself buying them when I've changed schools. Many of these items have been introduced by colleagues or I've just ran across and have fallen in love with:)

Painting Supplies that will change your life:


Little plastic containers with lids are great when you have multiples classes and just want to reuse paint without having to sacrifice your paint trays. You can fnd them really cheap at the Dollar Tree or Amazon Prime. I usually buy them at the dollar tree just so I can make sure they're the perfect size. But, here's a link to some on amazon if you're interested  - small containers with lids
Condiment Squeeze Bottles

• A colleague introduced me to these condiment squeeze bottles...how have I lived without them for this long?! I use these instead of trying to constantly pour paint or use those pumps that get clogged, spray paint all over the place or just make a mess. The only negative is they are sensitive when you squeeze them so just be aware of that. 


Towels for the tables - because I do not use paper towels. I know this is just a preference, but I think they make more of a mess than needed. I have used towels in my art room for years because if I spill happens, the towel soaks it up and there ussually is no need in worrying about cleaning it up and no crying students cause their art got ruined. The towel absorbs everything and we just keep creating art. I've always bought mine at Ikea cause they are cheap, but you could use old towels from home or buy rags from places like home depot, lowe's and amazon prime.

Tiny Spoons for scooping paint. I use these for scooping paint to put into the paint trays when students need to mix colors. This saves a ton of time, paint and keeps paints from getting mixed together cause they don't rinse there paint brushes out correctly. I love that these are biodegradable. 


Clay Supplies that will change your life:
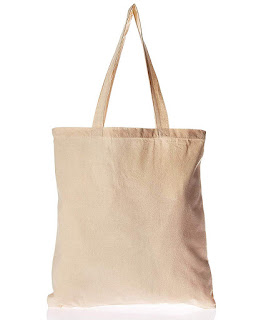

• Canvas bags are great if you can't afford to buy the fancy canvas wrapped boards for clay. I love that they have handles so when we are done we can just hang them on a hook until next class, they're supper easy for the kids to hand out and they don't get wadded up and wrinkled because they can be hung. They are so fabulous for clay because the clay doesn't stick to them and it keeps their projects contained to their space. I ordered mine through our art supplier, but you can find them on other sites like amazon prime. When clay dries you just knock it off and reuse them over and over. 
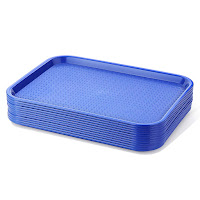

Plastic trays (cafeteria trays) are great for easily handing out clay projects in the works. They are also great to use with painting supplies. I have the students place their wrapped unfinished piece on a tray - per table - that way it's easy to hand them back out and keeps them organized. 

• Plastic bags are wonderful for wrapping and storing unfinsihed clay so it doesn't dry out. I buy these thicker and large ones so I can reuse them over and over. I have students write their names on masking tape and we tape it to the outside of the bags. If clay has to stay in the bag for too long make sure to add either a wet paper towel or a tiny bit of water - I use a spray bottle and spray inside the bag just to be safe. 


February 19, 2018


African Clay Masks
Creating African Masks
This is a continuation of a previous post about how I teach this project to 3rd graders. Here's the link to the first steps: Clay Masks before Bisque Firing.

Part 2 - Glazing & Adding the Final Touches 
When I set up tables for glazing, I do each glaze color at a separate table and have students travel with there pieces. 
- I know you might think what if they drop them? We review all the rules and procedures and I've not had anyone drop them. 
Rules:
Glazing Process
1. Hold your piece with two hands.
2. Walk.
3. Gently place you piece on the table.
4. Only 4 people at a table at a time.
5. Wipe off glaze on tables if it drips (sponges are on each table).
6. Paintbrushes stay at the table (don't travel with a paintbrush).


Glazed African Masks
After the glazing process is complete, I fire their masks again. Once fired then they start adding some detail to their masks - such as beads, raffia, etc...

Lesson Concepts:
- 3-D Shapes
- Clay - techniques and vocabulary (bisque, kiln, slip, score, etc...)  
- African Art
- Ceremonial Art 
- Elements and Principals of Art


November 16, 2017

Clay in the Classroom...


Here's a few more tips/tricks that I use when setting up clay in the art room. Clay is so much fun, but it's a lot of work for any art teacher. I'm hoping this will make it a little easier on someone, lol.


Table Set-Up Ideas:

What table set-up looks like.

1. Clay Mats, Bags, Boards, etc...

- I was fortunate enough to have these canvas bags to use for students under their clay. It makes clean-up, set-up, working so much easier. The handles are perfect for the students to carry them and put them away when we are done at the end of the day. 

NOTE: Make sure you have something under your clay so it doesn't stick and make a huge mess. 


2. Trays for Tools

Sharp Tools (separate)
- I use medium sized styrofoam trays to keep their clay tools in. One per table and they put the whole tray away at the end of the day. It keeps things organized and in a designated spot instead of everywhere.  NOTE: I keep the sharp tools separate because I don't use those much with the younger students. 

3. Slip

- I just use a plastic cup with a lid to keep slip in, but really anything with a lid will work. These get messy anyway so I don't use anything nice. 

4. Water

- I just keep a water bowl with 2 sponges in it for clean-up on the tables at all times. This makes things faster. I recycle the water/clay at the end of the day.   

5. Carts

- If you have a cart, use it to move clay around, store things you might need fast, etc... I keep a bag of clay on it so it's accessible to me in case I've made a mistake or someone needs clay. This has been a life saver. 


6. Table Trays

- I have some larger trays that I use for students to put their unfinished clay projects on. I used construction paper so I could organize them by their table color. This makes it so easy to pass out their projects. The trays have also helped students carry things, so we don't have any accidents. 


7. Storing Clay - individual student work. 


Designated Class Storage Area
Clay on trays, wrapped according to table color.
- I had a ton of plastic bags so I have students write their name (in sharpie) on masking tape and tape it to the bag. This way I can re-use them over and over. By adding a new piece of tape over the old one so the bags won't tear, I can keep these for a long time.

NOTE: In a previous post I mentioned clay set-up, check it out for more tips. 


Sneak Peek...

Our Clay Projects!


I'm so excited to finally get to share with you what we are doing with clay. I don't have photos of all the projects but here's a "sneak peek" and some of them. I can't wait till they get all the way finished with these. They are going to be so awesome!


2nd Grade "Hand Bowls"

I think these are turning out so cute! The ideas that these 2nd grader's came up with for the designs of their hand prints was amazing. 


Adding detail to their masks

3rd Grade "African Masks"

These were a challenge, but I knew that the 3rd graders could handle it. 
- They each had to sketch out their mask 2-Dimensionally in their sketchbooks.
- Then I discussed and demonstrated how to create them 3-Dimensionally. But, they had to do a lot of independent work to create their mask like their sketches. 

I have a couple of West African power points that I shared with the students. Just click on the links to see them: West African Art and Masks.

I can't wait till these have been completed. The detail they added is really going to make them amazing. Add we have some other surprises in store for these masks when they are complete. 


November 11, 2017

Clay Set Up - Prep Work


This is my first year teaching clay because, I never had a kiln before. So like any good art teacher, I researched it to death but, figured out that I needed to create my own game plan. So over the next few weeks, I'll be posting some of my own tips, tricks, etc... I don't have it all figured out but, maybe these posts will help another art teacher. 

Preparing Your Clay:

Rolled Clay
Slab Roller

I separate slabs with
plastic sleeves.


1. Roll out your slabs ahead of time.

- I'm fortunate enough to have a slab roller so I can roll slabs out for students to make things faster. 

NOTE: I do however have built into my lessons time for them to practice hand rolling their own clay and practice time for using all the different tools. I do this prior to giving them their final slabs for creating their projects.

2. Separate your slabs so they don't stick together. 

- I use thick plastic dividers to separate mine. They peel off and then I can reuse them over and over. 

Bagged and Labeled Slabs

3. Bag your slabs of clay.

- Make sure to seal your bags really well. I add wet paper towels inside my bags just to make sure the clay stays moist. I've been able to keep these bags for 2 weeks with no problem. I'm sure you could keep them longer if they are really thick plastic and you've sealed them well. 

4. Label bags with number of slabs.

- This just helps you to keep things organized. 

5. Declutter your art room.

- Put away anything and everything you don't need in your art room. You will need the counter and storage space for your students projects. 

6. Storage bags and paper towels.

- Use plastic bags to store the students incomplete projects in. Use paper towels so they can keep one inside their bags to keep their clay moist. I have them use masking tape to label their bags with their names, teacher and grade. Also I have students keep the same paper towel (recycle it) but, just re-wet it each day. 

This is just the start, I will be posting more pictures, tips and tricks over the next few weeks so check out my posts. I'll also be posting sneak peeks of the students awesome art, too.