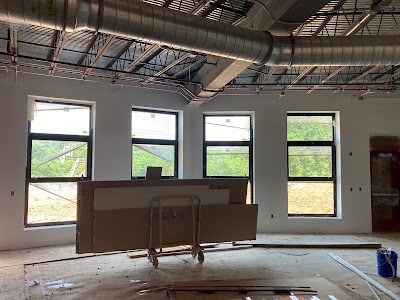
We are saying "Good Bye" to our old room and...
"Hello" New Art Room!
Showing posts with label Classroom Set-Up. Show all posts
Showing posts with label Classroom Set-Up. Show all posts
July 17, 2021
August 23, 2020

Welcome to the 2020/2021 School Year "Virtual Style"
Soon we begin the 2020/2021 School Year and it's definately going to be a unique situtation. This will be my first year not being face-to-face with my amazing art students. My heart is heavy as I LOVE seeing all my students each and every day. But, I will be teaching ART...just VIRTUALLY and I'll get to seem them through google meet once a week so that's a huge plus. I'm hoping this will be short lived and we can be back in the classroom together soon. So making the best of this, I've created a ton of interactive and virtual art lessons. As I get them all complete, I'll post them for all to see.
Here's one of many....my DIGITAL/INTERACTIVE "Welcome Letter" for parents with all the different links and information to hopefully make things easier.
July 28, 2020
Bitmoji Classroom Designs
"Virtual Classroom"
Working on creating my virtual classroom “Bitmoji Style”. So far I’ve created an Art Library, Calming Room, Art Gallery, Parent Sheet and my Art Classroom. Working on adding some other things like lesson links, etc... 2020/2021 School Year is kicking off soon and I’m hoping all my Amazing Artists will LOVE this.


July 13, 2020
September 28, 2019
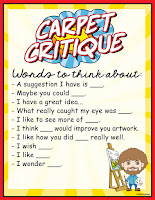
Art Critique - "Carpet Critique"/"Table Talk"!

Incorporating art critiques, talks, etc... has been a challenge for me. I've always done it, but felt like I needed to master this technique better. I do a variety of different things depending on the project, age group, etc... But I'm really thrilled with how this technique is going over with the students.
Tips:
1. Go over appropriate behaviour and language to ensure everyone contributes in one way or another.
2. I use a sheet like the above to help with how to word things. And being kind.
3. Use the walls, floors and tables to showcase unfinished and finished art talks.
4. Movement is crucial.
5. Wrap up everything at the end of class - why we do this, etc...
6. Incoporate famous artists works, too.
7. Compare and contrast.
If you'd like to use my poster, you can find it in my TPT Shoppe:)
August 24, 2019
Amazing things to have
in any art classroom...besides the basic supplies.
Painting Supplies that will change your life:
• Little plastic containers with lids are great when you have multiples classes and just want to reuse paint without having to sacrifice your paint trays. You can fnd them really cheap at the Dollar Tree or Amazon Prime. I usually buy them at the dollar tree just so I can make sure they're the perfect size. But, here's a link to some on amazon if you're interested - small containers with lids
 |
| Condiment Squeeze Bottles |
• A colleague introduced me to these condiment squeeze bottles...how have I lived without them for this long?! I use these instead of trying to constantly pour paint or use those pumps that get clogged, spray paint all over the place or just make a mess. The only negative is they are sensitive when you squeeze them so just be aware of that.
Towels for the tables - because I do not use paper towels. I know this is just a preference, but I think they make more of a mess than needed. I have used towels in my art room for years because if I spill happens, the towel soaks it up and there ussually is no need in worrying about cleaning it up and no crying students cause their art got ruined. The towel absorbs everything and we just keep creating art. I've always bought mine at Ikea cause they are cheap, but you could use old towels from home or buy rags from places like home depot, lowe's and amazon prime.
Tiny Spoons for scooping paint. I use these for scooping paint to put into the paint trays when students need to mix colors. This saves a ton of time, paint and keeps paints from getting mixed together cause they don't rinse there paint brushes out correctly. I love that these are biodegradable.
Clay Supplies that will change your life:
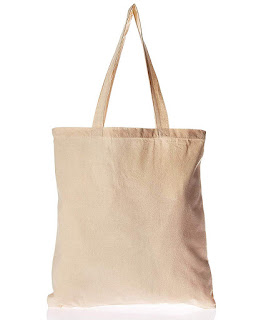
 • Canvas bags are great if you can't afford to buy the fancy canvas wrapped boards for clay. I love that they have handles so when we are done we can just hang them on a hook until next class, they're supper easy for the kids to hand out and they don't get wadded up and wrinkled because they can be hung. They are so fabulous for clay because the clay doesn't stick to them and it keeps their projects contained to their space. I ordered mine through our art supplier, but you can find them on other sites like amazon prime. When clay dries you just knock it off and reuse them over and over.
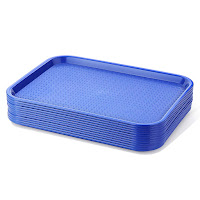
• Plastic trays (cafeteria trays) are great for easily handing out clay projects in the works. They are also great to use with painting supplies. I have the students place their wrapped unfinished piece on a tray - per table - that way it's easy to hand them back out and keeps them organized.
• Plastic bags are wonderful for wrapping and storing unfinsihed clay so it doesn't dry out. I buy these thicker and large ones so I can reuse them over and over. I have students write their names on masking tape and we tape it to the outside of the bags. If clay has to stay in the bag for too long make sure to add either a wet paper towel or a tiny bit of water - I use a spray bottle and spray inside the bag just to be safe.
August 05, 2019
The 2019/2020 School Year
is fast approaching and I'm excited to share some new tips.

One thing I like to do is have supplies that we use a lot in a place that can be easily accessable to students. I'm not a big fan of having them on tables. I know that many art teachers use caddies on their tables and I'm sure it's great. I don't do it because it takes up too much room and kids often play with them when it's unnecessary even when they know the expectations (pick your battles, lol). I usually have a few places spread throughout the clasroom that house our basic supplies.
Here's how I organize some of them in buckets:
- markers
- crayons
- colored pencils
- erasers
- pencils
- small sharpeners
- scissors
- sharpies, etc...
Each table gets one bucket/pail that they share and this keeps things organized and much more manageable. I often feel if you have too many supplies out at once, it's easier for things to get wasted and harder to manage.
I've written about organization and set-up a few times because I'm a huge believer in being organized.
This year I lined the wall under my white board with shelves and storage carts so I could have a variety of areas for students. I wanted to have a few center areas for students.
Organizing Other Supplies:
• Usually clear buckets are my preference when storing items on shelves and in cabinets. Makes it easier to see what's inside. I aso label them - I love these "chalkboard" peel and stick lables I got from Amazon Prime. They are not only cute but easy to whipe of and reuse if I switch things out.
My favorite is to use fun colors and shaped buckets, storage containers, bins, etc...
 • Oil Pastels -
 I bought these cute square buckets at Hobby Lobby and they're perfect for flourescent oil pastels. I put a towel down and then students can dump the bucket so it's easier to see the colors and keep the tables cleaner. Then when done they put them back in the buckets.

I bought these cute cups from the Dollar Tree and they're perfect for metallic oil pastels.
 I do the same thing with regular oil pastels, but I keep the BLACK, PEACH and WHITE ones seperate from all other colors. I have them in their own container - like colors together. This has helped me avoid the horrible mess of oil pastels getting so disguisting you can't tell the colors a part. I also only put one set per cup and each student gets their own cup. If a color runs out I give them a new one to place in their cup - no sharing that way everyone has what they need.
 I do the same thing with chalk pastels but the only difference is I keep the BLACK and WHITE ones seperate from all other colors. Since my saying is "BLACK LAST" (usually applies) it makes it easier for students to not grab and use the black before they are finished. It also keeps the whites from getting so gross you can't tell what color it really is, lol. Once again they dump all of them out on the towels so they can share and find colors easily. This keeps tabbles cleaner and they can whipe their hands on the towels if they get too dirty. Clean up after is a SNAP!
July 27, 2019
YouTube Videos
How I use YouTube for all my expectations, procedures and lessons.
I've written about organization and set-up a few times because I'm a huge believer in having your room organized. One thing I've been doing since I started teaching is creating short videos, slideshows or use photos to show students expectations and procedures in the art room.
- One reason I started this is because they really like watching a video better than listening to me talk. Keep it short and sweet.
- Second, as an art teacher you repeat things to a ton of different classes and this helps with the "broken record" phobia, lol.
- Third, you can use the time during the video (while it's playing) to set things ups, hand out supplies, monitor students, etc... and keep the flow of the class going.
- Lastly, the videos can be paused and replayed easily by you or your students. Great for using with students who need a refresher, who were absent and who need that extra time to see how something is done.
Here's just one of my simplier videos that I use to help with "hand washing" because we know the sink area can be crazy without expectations and proedures in place.
My YouTube channel is "private" for the most part. I hope to upload some videos soon of lessons that I've created and use in my art room. You can always check out the printed versions in my TPT Shoppe "Art is My Jam"! Enjoy :)
July 17, 2019
Answering some questions...
How do you decide what supplies to order?
Art Room Supply/Medium Checklist - Supply List...check it out in my TPT Shoppe.
2. After I have my inventory, I then highlight and mark the consumables I always need every year. To figure out quantity, I just base it off the number or students in the grave/school and how often they will be used. For example: clay is always a hard one to estimate but Ive found that this works really well. One box (50 lbs.) of clay usually can do 2 classes of 28 students. Having extra clay is never a bad thing as you can do small projects at the end of the year or use it for art clubs, teacher's nights, fundraising projects, etc...
NOTE: I always place 2 orders during the school year. A big order at the beginning and a smaller order around February/March.
3. During the summer I curriculum plan by creating a basic curriculum map so I can order the supplies I need. Here's an example of how mine looks - it's very basic and yes, it'll probably change, but not enough to cause issues with my supply order. I NEVER create the exact same artwork every year, I get bored, LOL! So I'm always creating new things.
How do you keep from going through tons of markers, colored pencils, etc...?
I will admit I'm OCD to the core and I have procedures in place for everything. I found that the more supplies you put out at once the more that will be wasted and they will go through.- I use cups and buckets for all my crayons, markers and colored pencils. Each table gets 1 bucket of each. Each bucket/cup has 2-3 packs of each item in them. For example: 3 packs of colored pencils per bucket is perfect and they won't fight over the colors. Also when markers run out, they tell me and we swap them out - I take the bad one and give them a new good one. I keep the buckets full and never do they have to borrow from others to find the colors they need. With crayons, each bucket has 2-24 pack of crayons in them since there are more per pack.
- I also use cups or small bins for oil and chalk pastels. If I can, each student gets their own cup of oil pastels to use. If I can't have a cup for each student, then I have 2 sitting by each other share one cup. For chalks, I have them in little bins and we dump them out on a towel and they share per table. It's perfect. I'll discuss why I use towels in another post.
- For other things...
• Sharpies - I have one closable clear bin that I put black sharpies in and I fill it with 30 to start. As they dry up, I replace them.
• Colored Sharpies - I have one clear bin that I fill with a variety of colors and I just kind of guess how many I start with depending on the pack sizes. Usually these aren't used as much so I don't have a huge system in place for them.
• Watercolors - every 2 students shares one tray of the cake ones. If it's liquids, I have re-sealable trays that the tables share so I can put whatever colors needed in each tray.
• Paint/Glaze - I love using re-sealable cups/trays so they don't go to waste. Depending on the project, I might have students rotate tables to use the color at that table. It gets them moving and helps with waste.
June 30, 2019
2019/2020 Room Set-up!
Although this a work in progress design,
I'm very happy with my new classroom design.
I'm very happy with my new classroom design.

 I've written about organization and set-up a few times because I'm a huge believer in having your room organized. It makes it easier for you as a teacher and your students to find things. By having procedures and organizational ideas in place, you will also have less problems in your classroom.
 For the last week I've been working on my new classroom set-up, although I'm not finished, I'm excited about how it's coming together.
 |
| My new posters for color familes |
I just finished creating these FUN posters and labels for "Color Families"...check them out in my TPT Shoppe.
Subscribe to:
Posts (Atom)


