Links


Banner

February 04, 2018


I hope you enjoy our February 2018 Newsletter! Students are learning about some great artists while creating their own art. I can't wait to share these photos with you. 

To view the PDF, just click on the link above and download the PDF to you computer. You do not need dropbox or to install anything, just download the file.


Exciting News!
Goshen is doing a "2017/2018 Yearbook Inside Cover Design Contest" and all students are invited to enter. 

Theme: "What Unites Us"

Attached is the permission form and guidelines that parents can download. 
Yearbook Contest Form - To view the PDF, just click on the link and download the PDF to you computer. 


January 08, 2018


"K" Gumball Machines


A really fun artist to introduce students to is Wayne Thiebaud. His "Dessert" art is absolutely amazing. Check out this interview that CBS Sunday Morning did with him: Interview Video


Kindergarten Examples

This, Wayne Thiebaud, lessons is a perfect way to introduce younger students to layering - creating objects in front and behind others. It's a little tough, but if you take it slow and model it, the results are priceless.


Lesson Concepts for Kindergarten:
- Shapes - basic shape drawing without using tools.
- Coloring - technique
- Outlining - technique 
- Layering - how to make basic shapes look like they are in front and behind one another. Very hard concept, but a great introduction piece for students to learn from. 

When teaching this lesson I discuss money, etc... with the students. It's a great collaborative piece for art and classroom teachers alike. 


Teaching Tips: If you are a classroom teacher, this lesson would be perfect to use with money. Have students figure up how much money they could make if they sold all of there gumballs, how many gumballs would they need to sell to make a certain amount of money, etc... I would probably use this with 2nd or 3rd grader's. 

Another great money lesson is this one "Breakfast Menu". Just click on the words breakfast menu above and it'll take you to the link. Anytime as a teacher you can create lessons that incorporate multiple subjects, the results will be amazing. 


Pablo Picasso 4th Grade Rooster Portraits

"Roosters" Pablo Picasso Style


Art by Pablo Picasso
If you have access to Brain Pop, Jr., I recommend using the site to introduce students to the art work and artist Pablo Picasso (https://jr.brainpop.com).  The print (to the left) is of Picasso's original that I based this project on. Love all the bright colors. 


4th Grade Student Examples
This lesson is a good change from the basic Picasso portrait lessons that you might normally do with students. You can teach this lesson using a variety of different mediums and concepts. I chose watercolors and oil pastels because I wanted to introduce the concepts of analogous and complimentary colors to students. 

Portraits - artwork of a person, animal and/or both a person and animal.  


Lesson Basics: 
- Portraits - Brain Pop has a great video you can use when teaching/introducing students to portraits. 
- Elements and Principals of Art - Line, Shape, Texture, etc...
- Color - Analogous and Complimentary (Check out my color wheel posters that I use when teaching these concepts. Just click on "color wheel posters" in purple above
- Medium - Oil Pastels and Watercolors


If you'd like to see step-by-step directions and lessons on my art projects, check out my Teachers Pay Teachers Shoppe. https://www.teacherspayteachers.com/Store/Mrs-Clauses-Creative-Classroom
I love creating new art projects for my students and am happy to share my passion with others. Enjoy!


I hope you enjoy our January 2018 Newsletter! So many amazing things happening in 2018, I can't wait to share them all with you. I have the best career ever...

To view the PDF, just click on the link above and download the PDF to you computer. You do not need dropbox or to install anything, just download the file.


January 02, 2018


Happy New Year!

I hope everyone had a fabulous Christmas/Winter Break and a wonderful start to the New Year. I'm so excited about all the great art we will be creating in 2018. I love having the time to get creative myself, I'll be introducing students to some new artists and art work that students are going to love. 


I found this on a post and thought I needed to share this with everyone. What a great way to be reminded ourselves and others at how art can change our lives. 

So lets start the New Year off RIGHT and CREATE ART from the HEART!


Never Stop Loving and Creating Art!

As a teacher, I thinks it's so important to be artist's ourselves. I love painting, pastels and designing. I took some time over the break and started working on my 2nd art book. I know it's lessons for my students, but I'm hoping to share it with many others. Leaving a legacy of LOVING ART as much as I do is my goal in life. 

I can't wait to share it and see how it turns out. Here's a sneak peek at the cover design. But, it may change before I'm all finished.  Ok...it will change, because I'm always changing things around, lol!

I've posted a few of the lessons from my book onto my TPT Shoppe. I hope they will inspire others as much as I have been inspired to create them


December 10, 2017

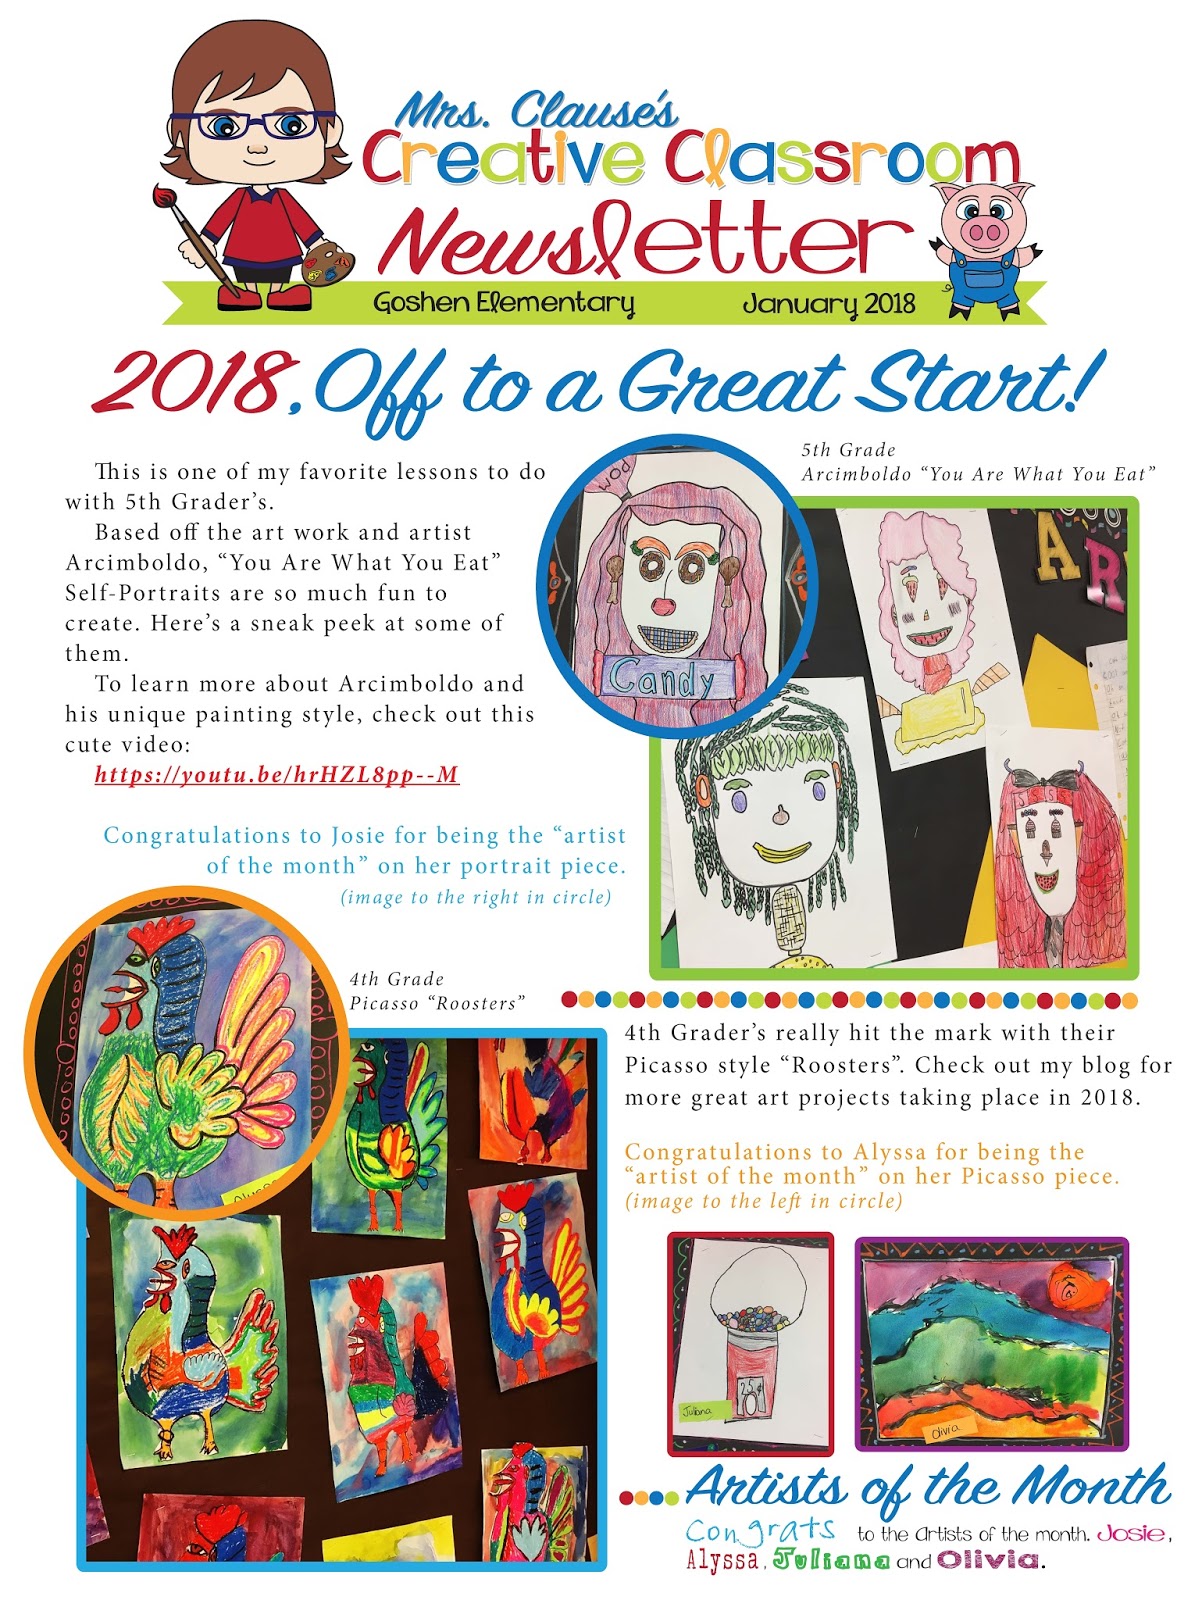
Step-by-Step on how to Create these:

Koinobori Fish


I decided to do this project with my Art Club because it's very time consuming, requires students to use hot wax and it's just COOL. I wanted them to create something they could have and hang up. Here's the steps I used, but of course it can be altered to fit the needs of your students and classroom.

The background of the Koinobori Fish:

Koinobori Fish are hung outside homes in Japan. They decorate the landscape of Japan from April through early May, in honor of Children's Day on May 5. In Japanese culture, the carp symbolizes courage and strength because of its ability to swim up a waterfall.


Materials:

Thick White Paper 
Newspaper
Iron
Paintbrushes
Metal Eye Dropper 
Batik Wax 
       - Different types that I have used are:
         Jacquard Batik Wax and/or Jacquard Bees Wax and/or Batik Wax
         *NOTE: You can also use: Batik Resist EZ, but I only recommend this on fine detail areas.
Wax Melter Kit - I absolutely love this product and recommend you get one.
Jacquard Dye Pack (variety of colors) 

Steps:

1. Students designed on paper their fish. We used thicker white 18x24 paper folded in half.
- Then outlined it in sharpie so they would be able to see the design through the fabric.
- I also had them mark their color choices before hand. This made it easier for them to choose dye when ready.
*NOTE: I put a limit on colors to 4-5 so it wouldn't get to busy.


2. After design, outlining and color choices were done and approved, batiking started. I had some students using wax and other start with the EZ resist to experience both and how they worked. Because students weren't all doing the same things at the same time, this made it easy to set up areas in the room where certain things took place. It also allowed for me to monitor their progress and medium appropriately.


3. Fabric was cut slightly larger than the paper. I had students attach the fabric with paper clips onto their paper design. This kept the fabric from moving while batiking.

4. We used two methods of applying the batik wax: metal eyedropper and paint brushes. The EZ resist was applied using small containers with metal tips on the end which allowed for ease in control of the liquid since it spreads.

5. After all batiking wax and resist was complete, students began dyeing. I use small disposable cups with lids to pour dye in. This kept it easy to distribute and allow students the chance to use the colors they wanted without having to move around the room. Their paper stayed clipped to the fabric so it helped them remember colors and soaked up excess dye. Dye was applied using paint brushes.

6. Once dyeing was complete and dry, removing the wax was he next step. Using newsprint and and iron, fabric was ironed to remove wax. Paper drawings remained under their art so wax didn't bleed through on the tables. The hot iron also set the dye into the fabric. You'll notice the change in dye color intensity, which is perfectly normal.

7. After wax removed, resist was washed off. Using hot/war water all pieces were washed by hand to remove all EZ resist then hung to dry.

8. After fabric was dry, I ironed them once more to remove wrinkles and any wax that might have been missed.

9. I went the extra step to sew the edges and add a bowl rod for hanging to the top.

I will post all the final pieces soon so check back in a week to see the results:)